The Cortex Bridge takes the printer's place on the AMS bus. The AMS units stay on their stock Bambu Lab firmware, and nothing is flashed, neither the AMS nor the bridge. You wire the bridge, run one installer on the Klipper computer, set three values for your printer, and load filament once while you watch.
Compatibility with stock firmware is not guaranteed: Bambu Lab could change its firmware at any time.
Before this page, work through Before you start (parts, the stronger buffer spring and the filament path) and Print and mount the case.
¶ 1. Wire the bridge
Power off first. Switch the printer off and unplug it from the wall, and unplug the bridge's USB, before you connect anything.
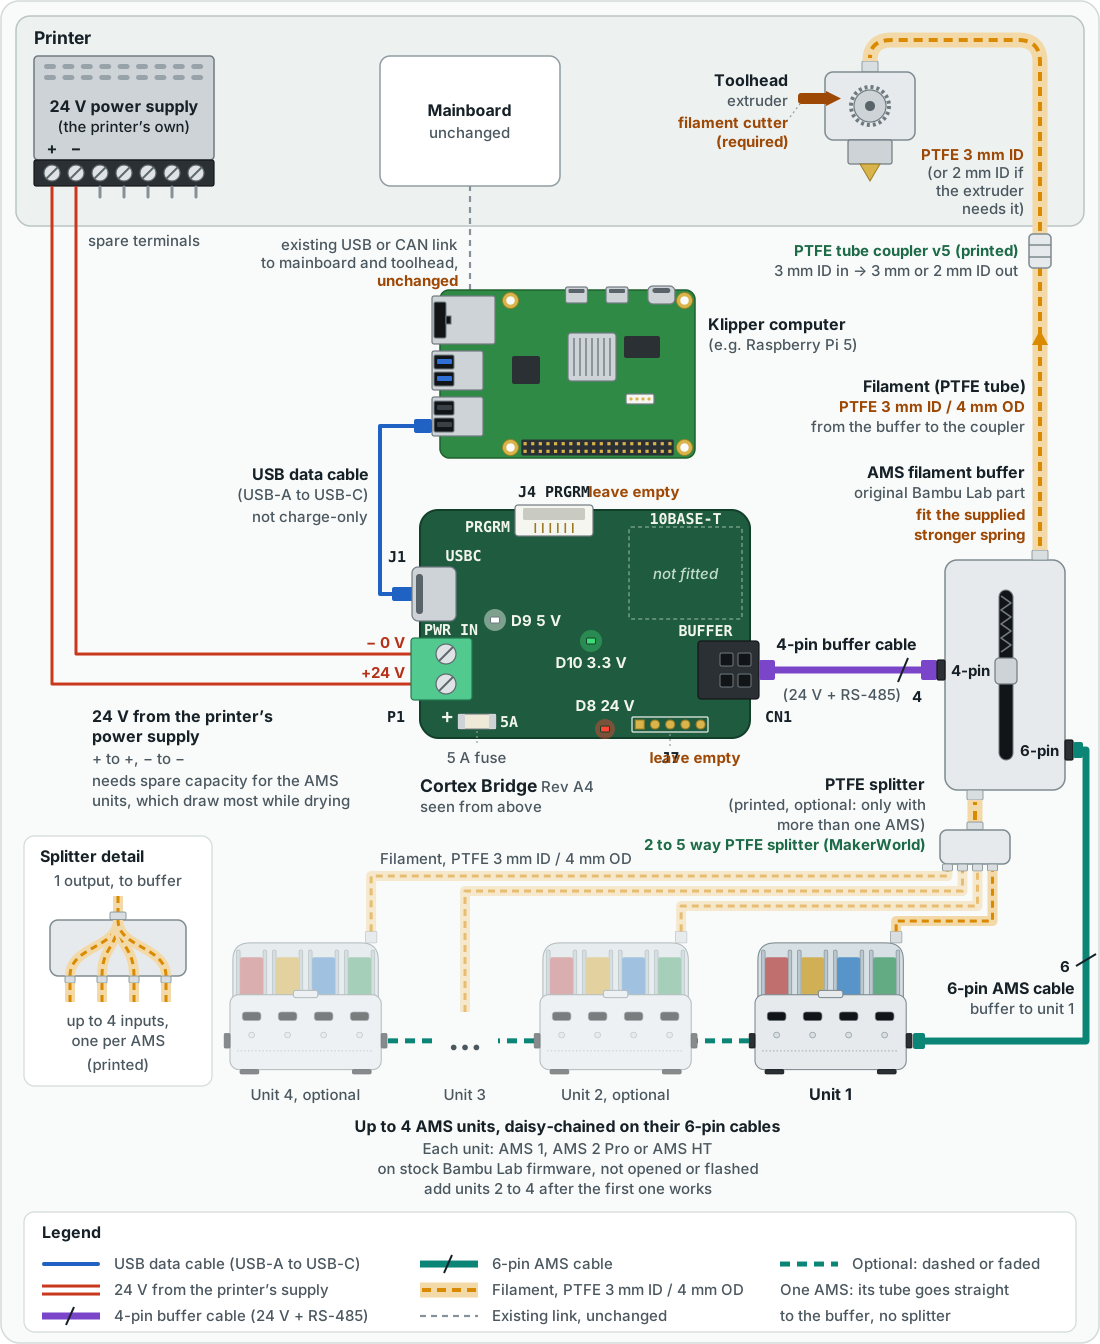
USB powers the bridge's own electronics. 24 V from the printer's power supply powers the AMS through the bridge. The Klipper computer keeps its existing USB or CAN link to the mainboard and toolhead.
¶ Connector details
P1, PWR IN. Green 2-way screw terminal, 5.08 mm pitch, lower left of the board. The + and − are marked on the board, and a 5 A fuse sits next to it.
| Pin | Mark | Connect to |
|---|---|---|
| 1 | + | +24 V terminal on the printer's supply |
| 2 | − | 0 V (−) terminal on the printer's supply |
CN1, BUFFER. 4-pin, 3.0 mm pitch, 2 × 2, Micro-Fit 3.0 style ("the 4-pin Molex"), right edge of the board. It goes to the 4-pin connector on the original Bambu Lab AMS filament buffer.
| Pin | Signal |
|---|---|
| 1 | +24 V out |
| 2 | 0 V / ground |
| 3 | RS-485 P |
| 4 | RS-485 N |
These are connector pin numbers, not a left-to-right order. Use Bambu Lab's 4-pin buffer cable as it is; do not re-pin a cable to match this table.
J4 PRGRM and J7. Leave empty: they are not used. J4 is the small white 6-pin connector on the top edge; J7 is the 5-pin header at the bottom right.
¶ Wiring order
- 24 V to PWR IN (P1). Run two wires from spare terminals on the printer's 24 V power supply: +24 V (often marked
V+) and 0 V (oftenV−orCOM). Loosen the two screws on the bridge's green terminal, put the +24 V wire in the terminal marked + and the 0 V wire in the one marked −, then tighten both and tug each wire. If you are not sure which supply terminals are spare, check the supply's label or the printer's wiring diagram first. Never use the supply's mains terminals (L, N, earth). - BUFFER (CN1) to the buffer. Plug the 4-pin cable into the bridge's BUFFER connector until the latch clicks, and its other end into the 4-pin connector on the AMS filament buffer. If the bridge sits further away, for example on its DIN clip under the printer, put a BIQU 4-pin 1 m extension (BIQU, Amazon) between Bambu Lab's cable and the bridge.
- Buffer to the AMS. Connect the buffer's 6-pin connector to the first AMS with the stock Bambu Lab 6-pin cable. The buffer connects to the first AMS only. Start with one AMS; later, add up to four in a chain, each with another 6-pin cable from the free 6-pin port on the AMS before it.
- Filament path. 3 mm ID / 4 mm OD PTFE tube from the AMS to the buffer (through the splitter with two or more AMS units), then into the coupler's 3 end; from its 2 end, 3 mm ID tube, or 2 mm ID tube if your extruder needs it, to the toolhead. Before you start explains why.
- USB-C (J1) to the Klipper computer. Use a USB data cable in a USB port on the computer itself, not a hub with its own power switch.
- Leave J4 PRGRM and J7 empty.
Check: every plug is fully seated, and the + wire is in the + terminal.
¶ 2. Power on and read the LEDs
Plug the printer in and switch it on. USB is already connected. All three LEDs should be on, and the AMS starts up as it does on a Bambu Lab printer.
| LED | Colour | On means | If it stays off |
|---|---|---|---|
| D9 | White | USB 5 V is present | Check the USB cable and port. Some USB-C cables are charge-only. |
| D10 | Green | The bridge's 3.3 V is running | It needs the white LED first. If white is on and green stays off, contact support. |
| D8 | Red | 24 V is on the BUFFER output | Check the wires from the printer's 24 V supply, their polarity at PWR IN, and the 5 A fuse. |
The LEDs show power only, not traffic or errors. The board guide has the details.
¶ 3. Install OpenAMS
Log in to the Klipper computer over SSH as the user that runs Klipper (on most printers, pi). Keep the bridge and the AMS powered, then run:
git clone https://github.com/OpenAMSOrg/openams.git ~/openams
cd ~/openams
./install.sh
Do not put sudo in front of ./install.sh; it asks for your password itself when it needs it. It is safe to run as often as you like.
The installer sees the bridge on USB and does everything for it:
- installs the bridge relay, the
cortex-bridgeservice that gives Klipper one serial port per AMS under/dev/oams/; - adds you to the
dialoutgroup; - writes
oams.cfgfrom the Cortex Bridge sample and adds your AMS units to it, after asking each one what it is; - adds OpenAMS to Mainsail's Update Manager.
The end of its output looks like this:
Cortex Bridge relay installed [OK]
...
Looking for AMS units behind the bridge (up to 45 s)...
  aaa7edf18856  AMS 2 Pro, 4 bays
Added ams2 to /home/pi/printer_data/config/oams.cfg.
...
Starting Klipper... [OK]
Check: you see Cortex Bridge relay installed [OK] and one line per AMS.
No Cortex Bridge connected; skipping its relay: the computer cannot see the bridge. Check the USB cable and the white LED, then run./install.shagain.No AMS was added to oams.cfg yet: the bridge is fine but no AMS answered. Check the red LED and the BUFFER and AMS cables, then runpython3 ~/openams/tools/cortex-bridge.py config --write.
¶ 4. Check the bridge
python3 ~/openams/tools/cortex-bridge.py status
Cortex Bridge
  USB:         running, serial CB0702B410535C, production firmware on /dev/ttyACM0
  Relay:       active (1 AMS online)
  AMS units:
    aaa7edf18856  online   /dev/oams/aaa7edf18856  configured
  Firmware:    bundled none yet
  Klipper:     active

Everything is connected.
Check: the last line says Everything is connected. Anything else names the problem and its fix; see If something is wrong.
¶ 5. Finish the Klipper config
Open oams.cfg in Mainsail (Machine, config folder). Between the Cortex Bridge units markers at its end is one [mcu] and one [oams] section per AMS, a [filament_group] (T0, T1, ...) per bay, and the [fps] section that reads the buffer through the AMS. Three things need your printer's values.
Filament path length. OpenAMS will not load from an AMS whose ptfe_length is 0. Measure the path from the AMS outlet, through the buffer, to the extruder gears, in millimetres, and convert it:
python3 ~/openams/tools/cortex-bridge.py ptfe 2050
2050 mm of filament path is ptfe_length: 2337
Put that number in the AMS's [oams] section as ptfe_length: 2337. The value is in the AMS's encoder clicks (1.14 per millimetre), which is why the command converts it.
The cutter. In [gcode_macro _oams_macro_variables], at the top of oams.cfg, set pre_cut_x/pre_cut_y, cut_x/cut_y and post_cut_x/post_cut_y to your printer's cutter positions. The values in the file are an example, not yours. Configure explains each value.
The toolhead macros. OpenAMS asks your printer to grab the filament after a load (toolhead_load_macro, default LOAD_FILAMENT) and to eject it before an unload (toolhead_unload_macro, preset to _OAMS_TOOLHEAD_EJECT, which ships with OpenAMS). Your printer needs a LOAD_FILAMENT macro that only moves the extruder; see configure.
Then restart Klipper (FIRMWARE RESTART in Mainsail).
Check: Klipper is Ready, and the console command OAMSM_SELFTEST reports each AMS without errors.
Adding another AMS later. Switch the printer off, plug the new AMS's 6-pin cable into the free 6-pin port on the last AMS in the chain, and bring its filament tube into the splitter. Switch the printer on and run python3 ~/openams/tools/cortex-bridge.py config --write. It adds only the new AMS and never changes the sections you have already set. Set its ptfe_length, then restart Klipper.
¶ 6. Add the Mainsail panel
The OpenAMS panel shows each AMS, its bays and spools on Mainsail's dashboard, and loads, unloads, edits groups and starts drying from there. It comes in the OpenAMS build of Mainsail: Mainsail itself, with the panel added. Install it with:
~/openams/install.sh --mainsail-panel
It downloads the latest OpenAMS Mainsail, keeps your Mainsail settings, keeps the Mainsail you had as ~/mainsail.stock, and points Mainsail's Machine → Update Manager entry mainsail at the OpenAMS build, so Mainsail's own update button keeps the panel. Reload Mainsail with Ctrl+Shift+R (Cmd+Shift+R on a Mac): a plain reload can show the old Mainsail from the browser's cache. The panel is added at the end of the dashboard's first column; move it under Settings → Dashboard.
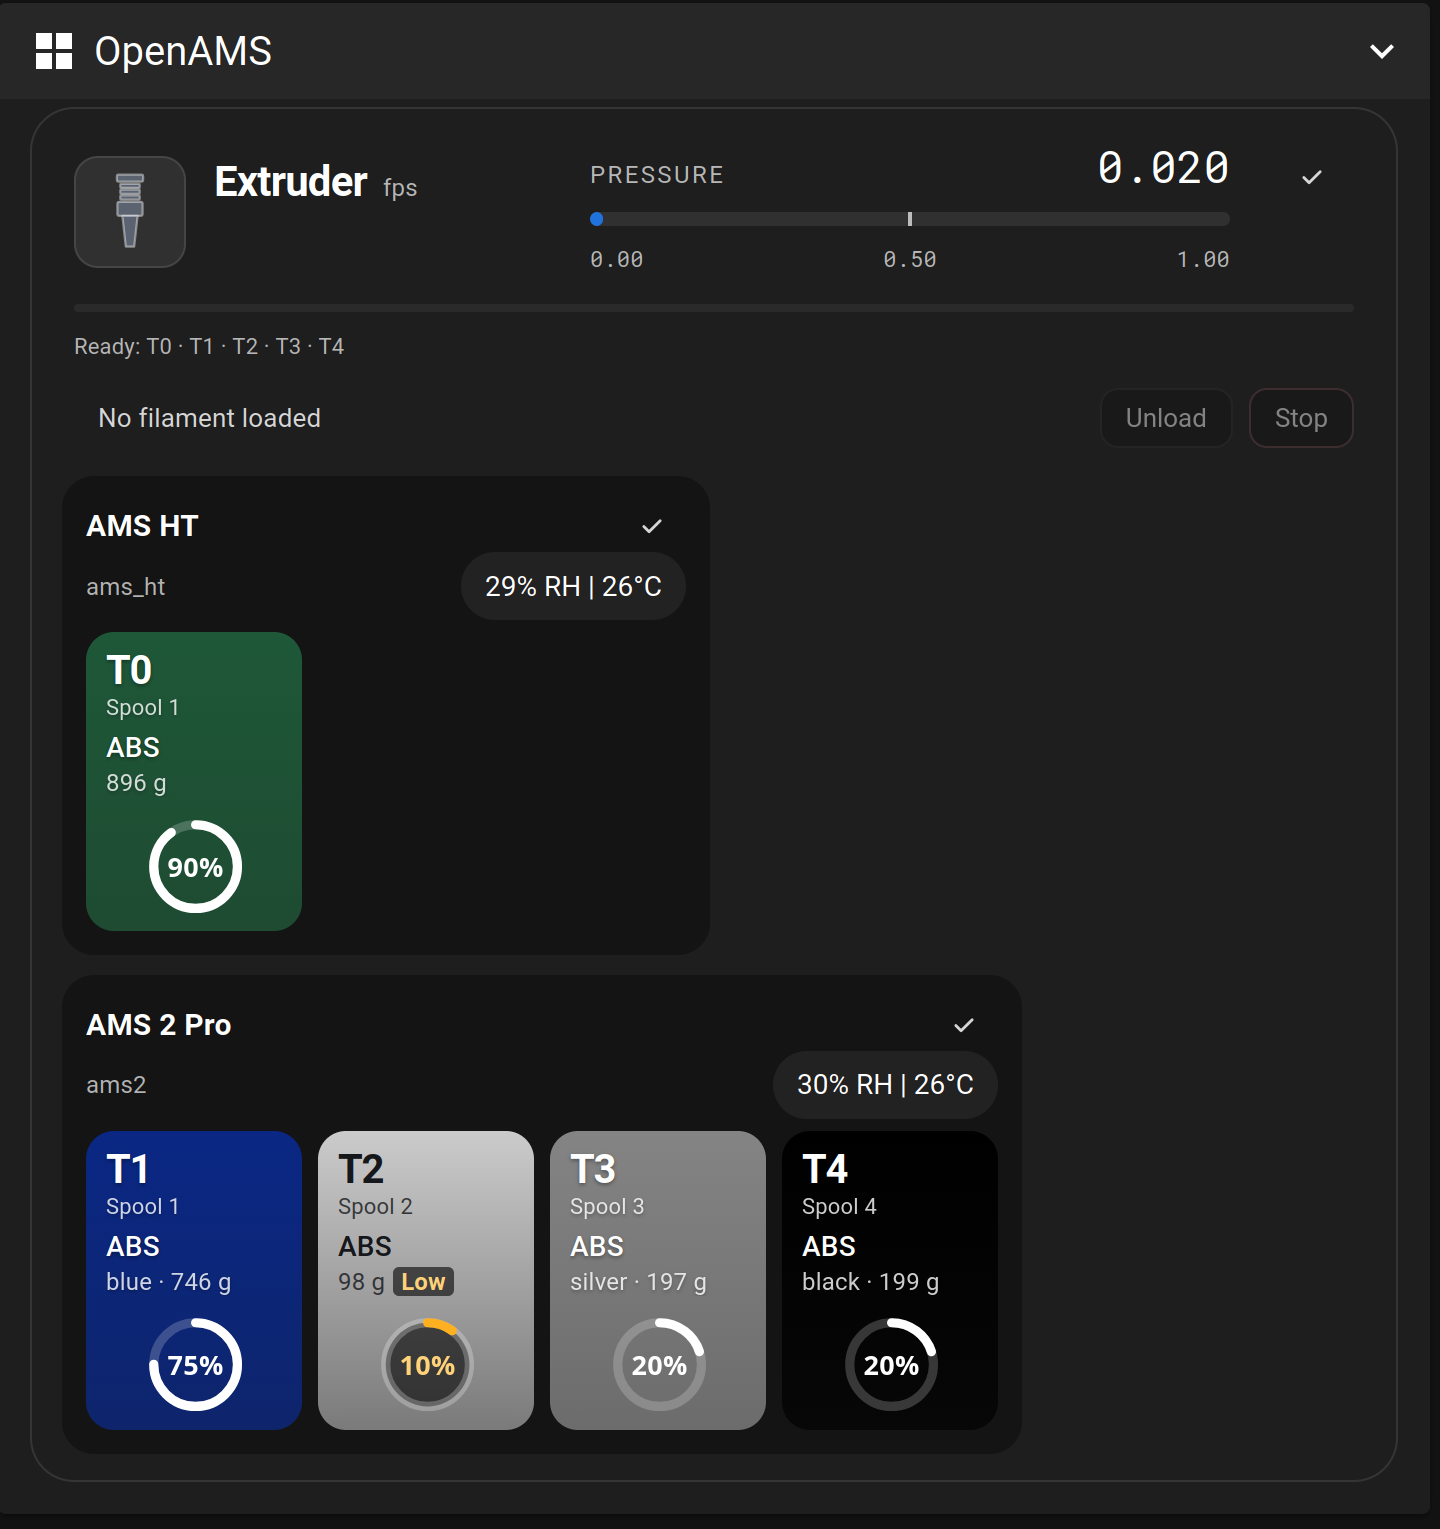
Check: the dashboard has an OpenAMS panel showing your AMS and its bays.
The panel is open source: openams-ui. The Mainsail build is OpenAMSOrg/mainsail.
¶ 7. First load
Do this with the printer idle and stay with it.
- Insert filament into the first bay of the AMS, as on a Bambu Lab printer, until the AMS takes it.
- Heat the hotend to that filament's temperature, for example
M109 S220. - In the Mainsail console, run
OAMSM_LOAD_TO_TOOLHEAD GROUP=T0. The filament travels to the buffer, then to the toolhead. When it reaches the extruder the buffer compresses, the AMS stops, and yourLOAD_FILAMENTpulls it in. - Run
OAMSM_UNLOAD_FROM_TOOLHEAD. The toolhead ejects the filament past its gears and the AMS rewinds it to the bay. - With filament in two bays and the cutter set, run a real swap:
T0, thenT1, thenT0. Watch the cutter, the retract and the purge.
Check: both loads reached the toolhead and both unloads returned the filament to its bay. Slice with one tool per [filament_group] (T0, T1, ...).
¶ Keep it up to date
- OpenAMS, including the bridge relay, updates from Mainsail's Machine → Update Manager, entry
openams. - The bridge's own firmware comes as signed packages with OpenAMS updates. Update the Cortex Bridge firmware explains when and how to install one.
¶ If something is wrong
Start with python3 ~/openams/tools/cortex-bridge.py status; its last line names the first thing to fix.
| You see | What it means | What to do |
|---|---|---|
| No LEDs at all | No USB power and no 24 V | Check both cables, and that the printer is on. |
| White LED off | No USB power | Use a data cable in a port on the computer itself. |
| Red LED off | No 24 V at the BUFFER connector | Check the wires from the printer's 24 V supply, their polarity at PWR IN, and the 5 A fuse. |
The bridge is not on USB |
The computer does not see the bridge | A charge-only cable, a bad port or a USB hub. Try another cable and port. |
The bridge relay is not installed |
OpenAMS was installed without the bridge connected | Connect it and run ~/openams/install.sh again. |
Start the relay |
The cortex-bridge service is stopped |
sudo systemctl start cortex-bridge, then status again. |
No AMS answers |
The bridge sees no AMS | Check the red LED, the 4-pin BUFFER cable and the 6-pin AMS cable. Power the AMS off and on. |
... AMS online but not in your config |
A new AMS was connected | cortex-bridge.py config --write |
Klipper: Unable to open serial port '/dev/oams/...' |
Klipper started before the AMS was up | Wait for status to show it online, then FIRMWARE RESTART. |
Klipper: Can not update MCU '...' config as it is shutdown |
Klipper was stopped for more than a few seconds. The bridge stops an AMS whenever Klipper goes quiet, so nothing keeps running unattended | FIRMWARE RESTART. |
Klipper: Spool N is not calibrated |
ptfe_length is 0 for that AMS |
Set it (step 5). |
| Loads stall, or the buffer reports arrival too early | Too much friction in the filament path | Check that every tube up to the coupler is 3 mm ID / 4 mm OD, any 2 mm ID tube starts at the coupler's 2 end, the bends are gentle, and the stronger buffer spring is fitted. |
| No OpenAMS panel in Mainsail after step 6 | The browser shows its cached Mainsail, or the panel is at the bottom of the dashboard | Reload with Ctrl+Shift+R and scroll down. cat ~/mainsail/release_info.json must name OpenAMSOrg; if not, run ~/openams/install.sh --mainsail-panel again. |
[WARNING] Spoolman is installed but does not answer |
Spoolman's own install failed part-way | Run ./install.sh again; sudo journalctl -u Spoolman -n 50 --no-pager shows why. |
To send support everything it needs in one file, run python3 ~/openams/tools/cortex-bridge.py support. It writes cortex-bridge-support-<date>.txt next to the other logs in Mainsail's Machine → Log files, and contains no passwords or keys.
Next: Using OpenAMS covers toolchanges, runout, filament groups and drying; Configure explains every setting.