¶ Preparing the boards for prime-time
.png)
If you purchased a rev2.1 board (instead of the current rev 3.x) these notes
¶ Configuring the firmware on the FPS PCB
The FPS PCB is intended, unless you decide to use it as a pure CANBUs device (more on this below), to be used as a CANBus bridge between the Raspberry PI and the AMS mainboard, or mainboards if using more than one AMS.
Via the AMS connector on the board, the FPS PCB acts as the bridge between the AMSs and the klipper serial interface via USB IN port. This board replaces U2C boards and similar devices that allow the RPI to speak the CANBus protocol.
In this configuration, the CANBus 120R jumper should be ON if NOT using the FPS CANBus toolhead output ports.
If using the CANBUS toolhead output terminals, this jumper should be OFF and the termination should instead be located at the printer's toolhead.
In this configuration the FPS PCB uses standard klipper firmware, built with the following parameters. To build the firmware, log in to your Raspberry PI via the console or SSH, and do the following
cd ~/klipper
make menuconfig
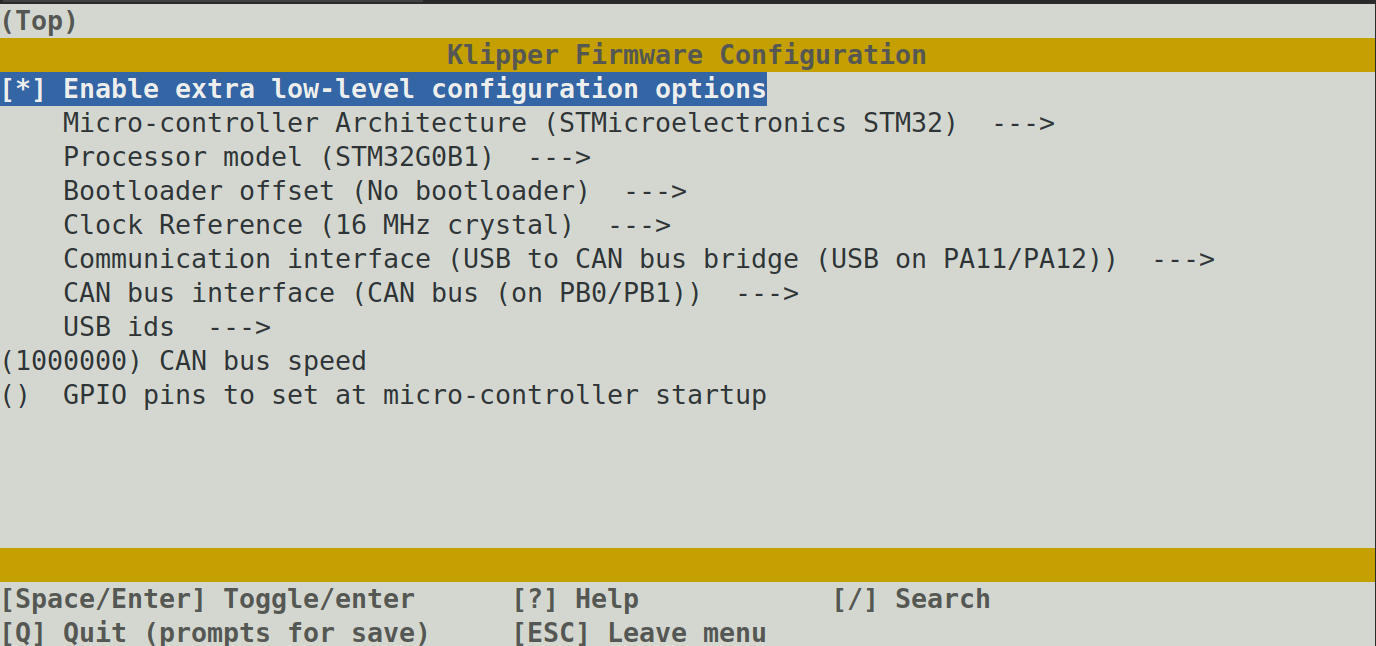
After exiting and saving this configuration, from the klipper directory, issue:
make
This should now build the firmware, and create a binary file under the ~/klipper/out directory with the name klipper.bin. This is the file we will use to upload to the board.
You can now place a jumper on the BOOT jumper of the board, connect it to the RPI via the USB IN port.
From the command line you can issue the following:
lsusb
You should be able to see a new device

This is the FPS PCB ready to accept the klipper firmware.
You can flash the baord with this command:
sudo dfu-util -d 0483:df11 -a 0 -R -D ~/klipper/out/klipper.bin -s0x08000000:leave
Disconnect the USB-C IN, take out the jumper, and reconnect the USB-C IN cable and now you should see via lsusb, !

The first device is the CANBus bridge adapter, the second is the USB hub built-in into the PCB (The second USB PCB port can be used for an additional USB device)
¶ Configuring the can0 interface and CANBus on the RPI
Please now, connect the board to the PSU +24V IN and PSU GND IN connectors, and power the board. Most likely you already have all of CANBus configured, but if in doubt, make sure to follow the steps described here. These instructions work for most distributions. If you find your linux distro does NOT have the command ifconfig, then it is of the newer distribution type, and ifconfig is being phased out. You should then follow these instructions here from esoterical.
Don't forget to make a note of the FPS UUID, you will need it later for setting up oams.cfg in Klipper configuration!
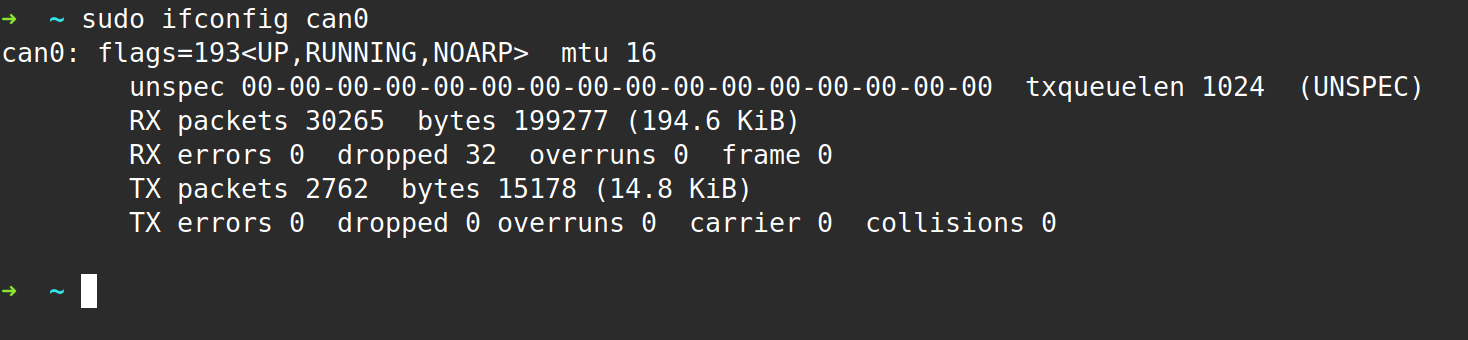
This step is crucial in the configuration and without a can0 interface showing up, you will not be able to proceed further.
If you followed the instructions correctly, you should be able to issue sudo ifconfig can0, and see the following:
If, on the other hand, you get this message

You will need to make sure to troubleshoot the canbus setup.
One critical aspect is that if issuing lsusb from the command line, you should be seeing the FPS as a canbus bridge:
Bus 001 Device 012: ID 1d50:606f OpenMoko, Inc. Geschwister Schneider CAN adapter
If this device is not present, can0 will not be able to come up since there is no hardware device that implement the network. You may want to check your build paramenters for klipper and make sure the FPS is flashed properly.
¶ Alternative FPS setup for printers that already have CANBus capabilities
Additionally, the FPS (filament pressure sensor) board can be used a canbus device, instead of a USB to CANBus bridge in klipper.
If you already have a u2c board or something similar and a canbus installation you might want to use the device as a plain canbus device, power it via 24V and connect to your already existing CANBus HIGH and CANBus LOW connectors. In this configuration the 120R canbus termination jumper should be OFF. This setup is uncommon and dedicated for advanced users.
Since the FPS will just be a regular CANBus device, you will have to first compile katapult, and upload it to the device.
You can do the following from the RPI command line:
cd ~/
git clone https://github.com/Arksine/katapult
cd katapult
make menuconfig
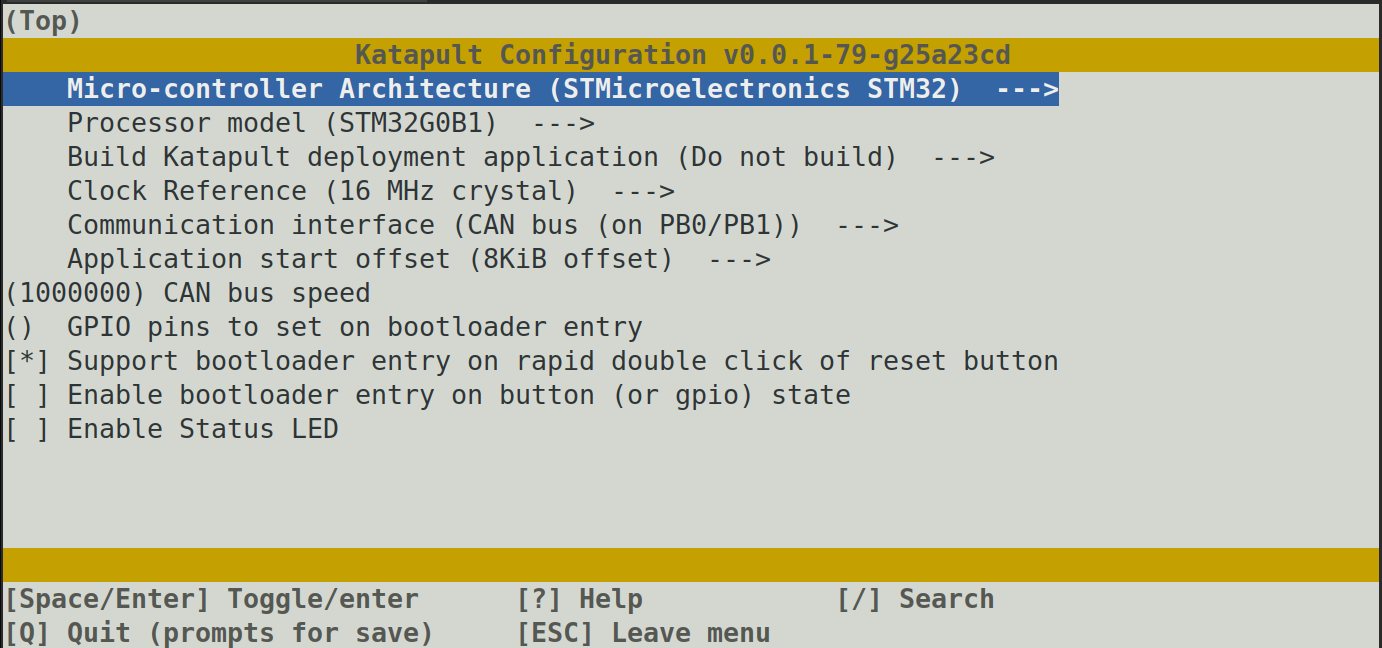
Then:
make
You can now place a jumper on the BOOT jumper of the board, connect it to the RPI via the USB IN port.
From the command line you can issue the following:
sudo dfu-util -d 0483:df11 -a 0 -R -D ~/katapult/out/katapult.bin -s0x08000000:leave
The board is now configured for CANBus, and in order to be flashed with Klipper, you will have to have it on your canbus.
Once CANBus is configured, CANBUS high and CANBUS low are connected and the FPS is powered via 24V, you should be able to issue the following from the command line:
sudo systemctl disable klipper.service
sudo shutdown now
Poweroff the printer entirely. Then start it again, and log on to the shell:
source ~/klippy-env/bin/activate
python ~/klipper/scripts/canbus_query.py can0
You should get a response similar to:
Found canbus_uuid=66e4a3d0cd57, Application: CanBoot
Don't forget to make a note of the FPS UUID, you will need it later for setting up oams.cfg in Klipper configuration!
Now you can go do the following:
cd ~/klipper
make menuconfig
Enter the following settings:

make
Time now to upload the firmware via CANBus and katapult:
python ~/katapult/scripts/flashtool.py -u <your_uuid> -f ~/klipper/out/klipper.bin
This should upload the firmware via CANBus.
Issuing this:
python ~/klipper/scripts/canbus_query.py can0
Should now produce this instead:

This means klipper is now active on the PCB.
Re-enable klipper and start it:
sudo systemctl enable klipper.service
sudo systemctl start klipper.service
You are now done setting up the software for the FPS board.